What is RfM?
RfM is a highly affordable Maya plugin that provides RenderMan image quality "out of the box" - no Slim, MTOR, etc. - just use Hypershade and the rest of Maya to do your lighting+materials, and render like you would when you generate Maya and Mental Ray renders :)
The current RfM version is 4.0. This is Pixar's RfM page, and here is a 4.0-specific page, and the product FAQ.
Basics
Load the RfM plugin via the plugin manager.
Load this 'walking teapot' scene into Maya, attach Maya shaders as usual, do 'Render-> Render Current Frame' to see the Maya version (for baseline comparison).
Now do 'Render-> Render Using-> RenderMan' to invoke RenderMan :) Yes, it's THAT simple! The pendulum has now swung to the other extreme - in the first couple of classes, you had to deal with 'raw' RIB files (scenes) and .sl, .slo files (shaders). But now, you're doing one-click rendering..
The idea is this - you can use Maya's Hypershade, AE, 3D window, MEL, curve editor, everything you already know - and simply render out using RfM, as an alternative to the native Maya renderer, Mental Ray, or other plugin renderers you might have installed. The RenderMan image should match the others in terms of image resolution (x,y) and camera view. But beyond that, RenderMan should hopefully give you a BETTER image when it comes to antialiasing, texturing, displacements, motion blur, DOF, global illumination.. just about everything! Don't take my word for it, see for yourself!
All this comes for a fixed price: $995 for a commercial CG studio (for a single license), cheaper for students, $0 for educators.
Now that you know the basics, let's explore selected topics.. We'll look at more topics next class. Additionally, you can learn more by tirelessly experimenting, going through Pixar's tutorials (that ship with the RfM documentation), reading up stuff from the web, etc.
'Quality settings'
The settings to specify image quality, and many other settings and other UI are all in one familiar place - 'Render Settings'. Just select RenderMan as your renderer (this might already be set):

Load this scene, and play around with the RfM/RMan quality settings.
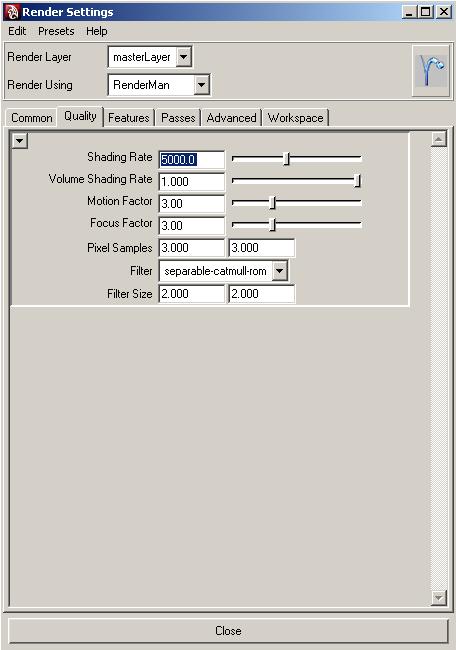
In particular, modify the shading rate (which as you know is "micropolygon area in pixels") and also the Pixel Samples numbers (supersampling grid density). Viewing just the alpha channel, you can see the effect of changing these to 'coarse' values - the image has artifacts but does render faster.
Texture mapping
One of RenderMan's many strengths is the high quality of texture lookup, which translates to "excellent texture mapping". Whether the surface over which the map is applied occupies a large screen area or is a small blip, the texture quality never suffers (eg. no unnecessary loss of detail, 'fuzzing' or aliasing (jaggies), holes, etc.
This scene can be used to play around with texture-mapping. You need this TIFF file to use for generating the texture map (simply load it into a Maya 'File' node as usual). You can fine-tune the mapping as usual, by modifying the appropriate Maya place2dTexture node (try it).
Deep shadows
Hair/fur consists of fine, closely spaced, 'fuzzy' geometry (curves) which need to be (lit and) rendered well in order to look believable.
That said, if we just use the 'standard' shadow map technique for hair/fur shadows, the results look "flat" - the shadows lack softness (high antialiasing) and transparency. Motion blur doesn't look good either. Pixar's 'Deep Shadow' technology thankfully rectifies these problems, and is great for hair, fur, smoke, glass etc., whether these are static or in motion. The following is a comparison between regular and deep shadowing:

Adding deep shadows couldn't get easier, using RfM. Start by loading the following scene, which uses Maya Fur ([right]click on the image):

Render. You should use a render with 'standard' shadows. To switch to deep shadows, look in the AE for directionalLight1. Here's how to add Shadow/Deep Shadow to a light:

To switch the shadow type, use the Shadow Type's drop down in the AE, under Extra RenderMan Attributes. Re-render. Richer shadows!
To get additional control, you need to enable parameters. Do so this way:

Now you can adjust the attrs to customize the shadow map generation and lookup.
Summary - adding deep shadows is easy - do so in lights' AE dialogs.
PS: Here is another scene you can use, to render fur.
Passes
A lot of times it is useful to be able to render a scene in several different secondary 'output passes' (components) so that these can be independently manipulated in programs such as Nuke/Shake, before being composited together. Note that these are _generated_ the same time the primary (composite) image is being generated.
Load this scene, then:
- open the RenderMan Globals and select the Passes tab.
- locate the Output subtab of the Passes tab.
- open the pull-down menu (which looks like a downward arrow) next to the Output field and do:
Output -> Create Output-> DiffuseDirectShadow

Render. This will create the primary (main, composite) image as well as additional diffuse shadow one. The additional images will be stored on disk, under the 'renderman' subdirectory within the main Maya project. You can create more secondary images by simply repeating the above step (Output -> Create Output -> <ones you want>). Likewise you can delete them via Output -> Delete Output.
Here are the various secondary output "channels" you can generate:

Using an RSL (.slo) shader
RfM used to be a closed-off world wrt shaders, meaning, the only shading that happened was Maya-derived (using Maya lights, materials). But that changed for the better - now we can selectively apply RenderMan (.slo) shaders to geometry! This is a 'best of both worlds' scenario.. The RenderMan shader could be written to way more sophisticated calculations (eg. a to create better 'wood' material), do more by reading in extra data files, use functionality embedded in non-RenderMan 'library' code, etc. In short, this is a very powerful feature to have. Plus, it also lets the thousands of 'legacy' .slo shaders out there, to be applied to Maya surfaces.
Load this scene into Maya, look in Hypershade. You will see a 'RenderMan Shader' material - *that* is how we bring in .slo - simply browse for the .slo from within the RenderMan Shader, and apply it (RenderMan Shader) to Maya geometry (so RenderMan Shader acts as a "wrapper" for .slo - clever!).
Compile (how?!) this .sl shader (which in source form) and apply it to the killeroo. Alternately, skip the compiling, use this .slo directly.
Note that you can attach a RemderMan light shader .slo to a Maya light (point/spot/ambient/direct) via an 'adapter' shader called 'RenderMan Light Shader':
* create a Maya light
* under Attributes in the AE, do Create Custom Light Shader
* scroll to the bottom of the AE, where will see a connection to the
  newly-created 'RenderMan Light Shader'
* click on it, then use its file browser to load in a .slo which
  is of a 'light shader' type (compiled from a .sl light shader)
* adjust shader params
* render! You should see the RMan light affect the scene
Now you know that you can bring into RfM, any .slo shader. FYI, you can use Slim to generate interesting ones, and import them like we explained above. You can also use other shader generators such as ShaderMan.
Motion blur
Load and render this scene - no motion blur yet.
To enable motion blur, look under Render Globals -> Features. Render - motion blur! Extent of blur is controlled by Shutter Angle, measured in degrees (eg. 5 means the shutter stays open 5/360th of the duration of the frame).

Quality is controlled (just like for DOF - see next topic) via PixelSamples. Try 8x8, 10x10, etc.

Depth-of-field ('DOF')
DOF can be enabled using Maya's DOF setting, for the Maya camera node (using the AE). Turn the 'Depth of Field' checkbox on. Also, set the 'Focus Distance' value appropriately (distance to plane at which there will be sharp focus). In order to help with this (finding out distance-from-camera of selected objects), turn on Maya's 'heads up' display.

This test scene can be used to experiment with DOF. These texture maps go with the scene (be sure to assign them to six texture nodes in Hypershade - look for the nodes in the 'Textures' tab).
Play with the PixelSamples quality setting, to adjust quality. Also, set Motion Factor to 0 [to preserve texture map sharpness].

The above was an introduction to RfM. In Part II, we'll look at more topics, including global illumination.